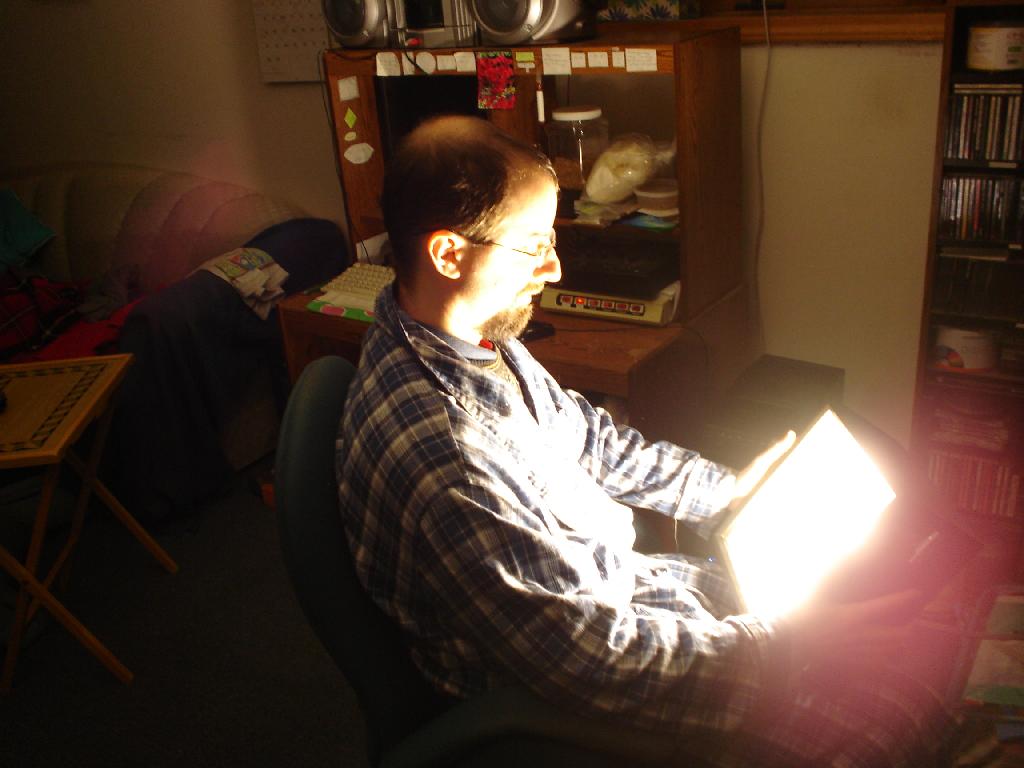
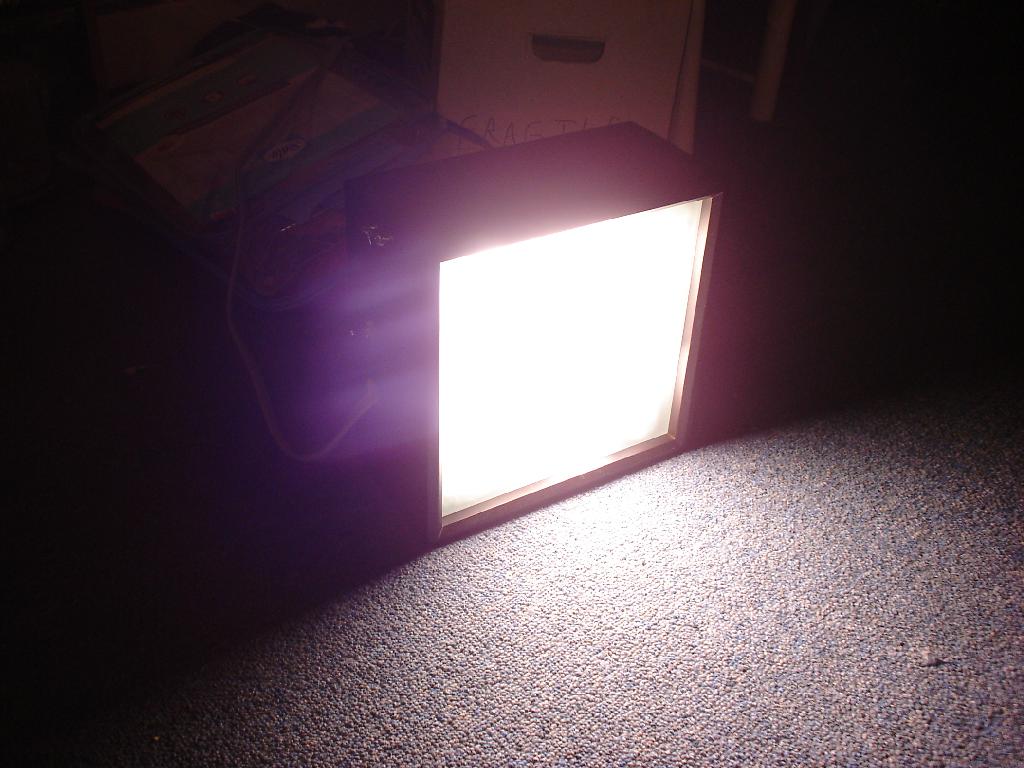
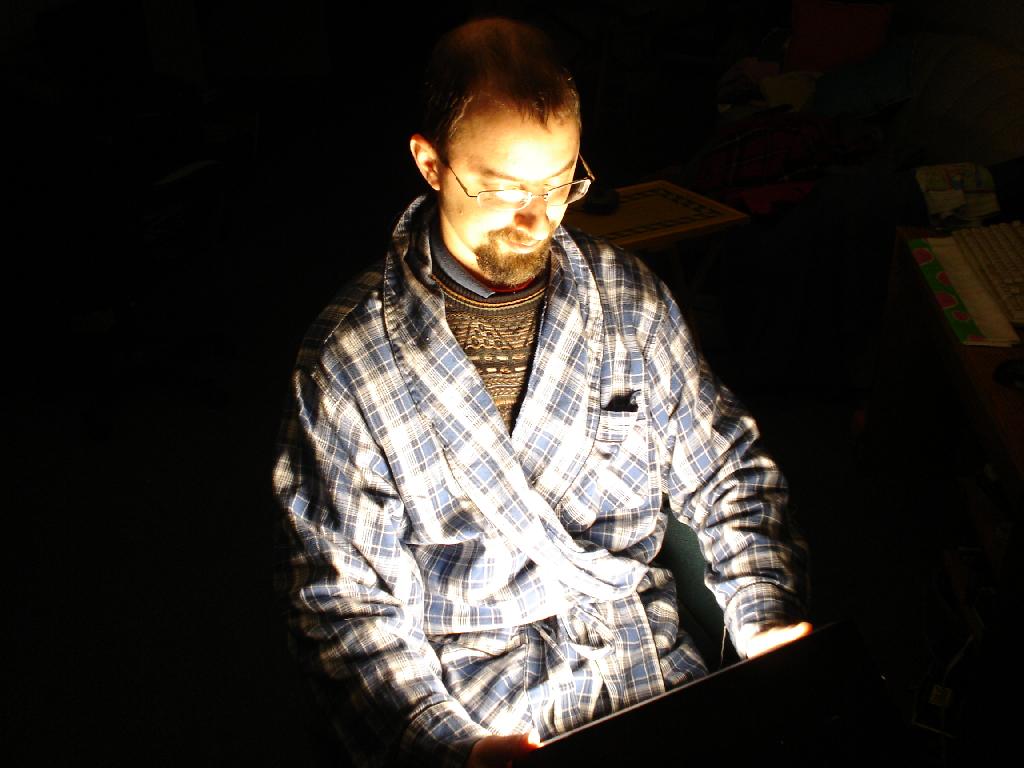
I built a light box. (The kind you use for treating seasonal affective disorder, not the kind you use for photography.) To understand what I mean by "ridiculously bright," please note that the following picture was taken at night, with the lights off. Much of the background is visible only because of the light reflected off my face.

Disclaimers: Please don't try this if you lack a basic understanding of electrical wiring. If you try it anyway, I will not be responsible for your Darwin Award. Also, this took more work and money than I anticipated. If you can make do with a commercial light box, just buy one.
Although I figured it all out as I went, this is what my shopping lists would have looked like (along with what I paid, before tax):
From the home improvement big box store:
Four 6-inch, 42-Watt fluorescent bulbs with GX24q-4 bases; 3200 lumens each ($40)
6-foot air conditioner power cord ($13)
A bag of assorted wire connector caps (I had some already.)
From the crafts store:
Two shadow box frames, 10"x10"x2" inside. ($42 (on sale for 40% off))
Hardware store:
Several feet of solid 18-gauge insulated copper wire ($5)
Small hook & eye set ($2) (had one left over)
Small hinges ($4.50)
Box of wood screws (size 4 x 1/2) ($4)
Box of short machine screws and bolts (I had some lying around.)
Heavy duty toggle switch ($5)
From the glass shop:
10"x10" sheet of 1/8" thick frosted glass (Should have been $11, but paid $7 due to wrong quoted price. Other places quoted $25 or more.)
From the electrical supply store:
Four GX24q-4 (4-pin) sockets ($28.70)
Two 42-watt ballasts ($54.40)
Things to have on hand:
Aluminum foil
Screwdrivers
Drill
Chisel or other gouging tool
Framing nail gun (or some glue)
Hard, round piece of plastic with a hole big enough for the power cord
2-part epoxy
Here's what much of the core stuff looked like:

Learn from my first mistake: This light box is tremendously overpowered. If I were doing it again, I'd use half the bulbs, ballasts, and sockets, saving $61.55 right there. I think it still would have been brighter than a commercial light box.
Learn from my second mistake: I also should have looked for some housing roomier than these shadow box frames; screwing the sockets to the frame was very tricky, as I could not fit a normal screwdriver that close to the glass. (I wound up using needlenose pliers to turn an eyeglass screwdriver: An annoyance to be avoided if at all possible.)
Step 1: Install the frosted glass into one of the shadow box frames. I enlisted the help of a friend who happens to be a great framer, as I had no idea what I was doing. (That generally doesn't stop me, but I knew he would be far more efficient, and somewhat less likely to break anything, than I.) He pried the inner frame ("spacer") away from the outer frame that it was glued into, and removed the clear glass. The frosted glass didn't quite fit (I hadn't realized that the shadow box wasn't quite square), so he ground it down a bit, dropped it in, and put the spacer back on top of it. Rather than glue the spacer in, he used framing nails to hold it in from the back, clipping off the protruding ends.
Step 2: (See below before you start this.) Trim back the socket end of the power cord. This was very tricky! I wanted a cord that flared out at the end, so that it couldn't be yanked out of the box, but that had bare wire ends. So I hacked away half of the thick plastic socket (mostly with a chisel), while carefully avoiding the three wires so that they could stick out to a usable degree. This was stupidly difficult, and I severed one of the wires on the first try, forcing me to cut the whole socket farther back.
Learn from my third mistake: I could have bought a (cheaper) dishwasher power cord, which came with the exposed wires at the correct end, and found something to clamp to it, to keep it from getting yanked out. Or I could have plugged something into the socket end of the cord, and trimmed that as needed.
Step 3: Connect wires, plug in bulbs, and test the electronics. (But see "my fifth mistake" below.) I didn't even bother with the toggle switch here. I had never worked with fluorescent tubes and ballasts before, so I just wanted to make sure that I could make light happen. The ballasts come with wiring diagrams. I plugged the extension cord into a power strip that I could switch on and off. I already needed more wire than was supplied with the ballasts. (For some of the wire that didn't come in the right colors, I used magic markers on white wires. Using the right color wires is like documenting your code: It doesn't matter at first, but when somebody (including you) has to troubleshoot it later, it can make all the difference.)
Tip: Even at hardware stores, solid 18-gauge wire may be tricky to find. I called ahead, and found that I could get an entire spool of it very cheaply. That turned out to be bare wire. Oops! I wound up finding it packaged as two wires in a plastic sheath (lamp wire, labeled "18/2") and five wires in a plastic sheath ("18/5"), which would have saved me a couple of bucks if I'd found it first:

Step 4: Screw it! Detach the wires from the ballasts (you'll have to use the supplied flange (small pokey thing) to release them), but leave them attached to the sockets. Screw the sockets into the shadow box frame (the one with the frosted glass). Use firm pressure on the screwdriver, because the spacer is not as solid as it looks, and the screws can shred it if they pull too hard. (Ignore this if you were smart enough to find an alternative to a shadow box frame.) Figure out where you want to mount the ballasts. I mounted them on the inside of the back cover (particle board) of the second shadow box frame, drilling holes for the machine screws. (For convenience and fire safety, I removed the velour covering first.) I also drilled a 1/2" hole for the wires, very near the hinge side of the box so that the wires wouldn't pull out when the box opened. (I could also have drilled holes directly to the ballasts' bottom jacks, but I was concerned that this would make maintenance difficult once the box was assembled.) In one side of the rear shadow box (at the right of the "parts" picture above), I drilled holes for the power cord and the toggle switch. I also had to chisel out a rectangular portion of the spacer to accommodate the toggle switch, which wouldn't otherwise reach all the way through the box. I cut a notch in the side of the small, hard plastic doohick (it was a piece from an old faucet) and mounted it on the power cord (after threading the cord into the box) to prevent the cord from pulling back out.
Learn from my fourth mistake: During its first use of more than a few seconds, my light box got hot too fast, and the front glass cracked. (Though it remained usable.) If, for some deranged reason, you make yours as powerful and as cramped as mine, drill some high and low ventilation holes in the front box.
Step 5: Reconnect wires. I included the toggle switch in the circuit this time, on the white (live) wire. (People sometimes put switches on the neutral wire. As a result of this, I've seen someone get shocked by a light socket that was turned off. Please don't ever do it.) I had to lengthen the wires (i.e., attach extra wires) from the sockets on the side of the box away from the hinges, so that they could reach their ballast through the hole in the back cover of the other box. Make absolutely sure that there is no bare wire showing in the front box with the bulbs.
Learn from my fifth mistake: Use longer wires between the far sockets and their ballast. (I didn't just rewire them because that would have involved undoing and redoing all of my work screwing them in. Remember the needlenose pliers and eyeglass screwdriver?)
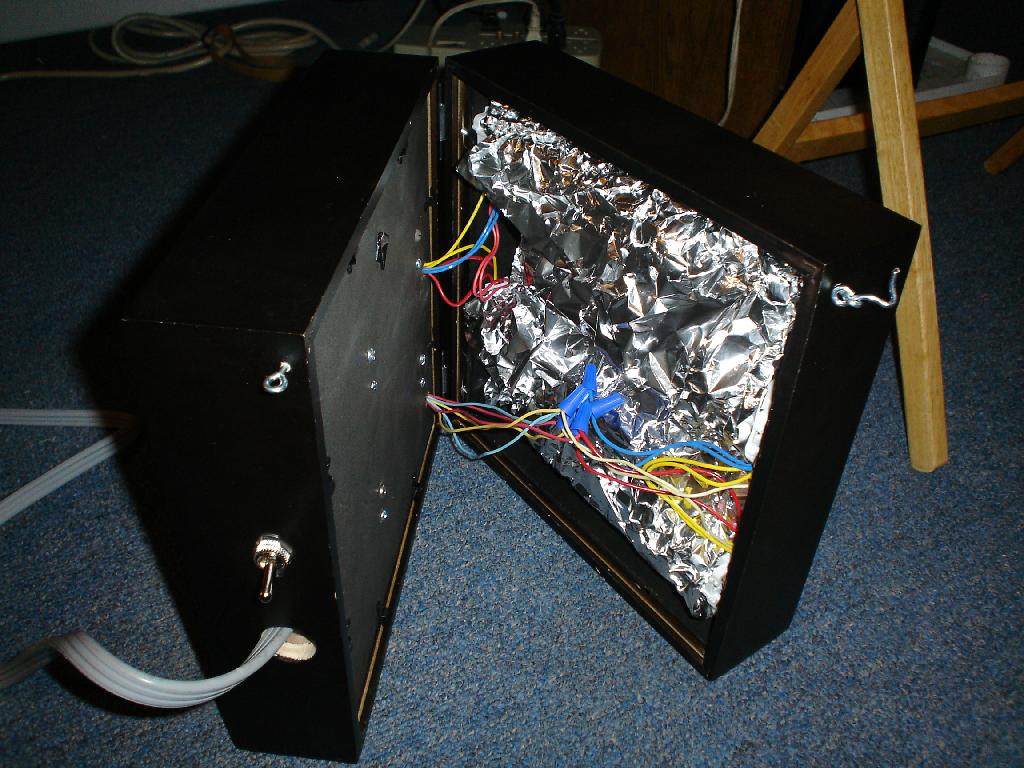
Step 6: Assemble! Secure the back cover of the rear shadow box. Install the hinges on one side, and the hook and eye on the other. Crumple a sheet of aluminum foil, and tuck it around the bulbs. (This is why bare wire cannot show here.) Pull it back enough to allow air flow through the ventilation holes. Use your favorite adhesive (I like two-part epoxy) to secure the power cord's socket to the round plastic doohick, and the round plastic doohick to the inside of the box. Hold the cord taut with some weight if needed, to keep all three bits firmly together while the adhesive cures (for however many hours the package indicates).


And you're done!


Please comment if you have improvements (aside from the obvious*), especially regarding alternatives to the shadow box frames.
* Just buying a light box.
Edit: My friend Tracey asked what I did about UV protection. The answer is that it never occurred to me. However, Wikipedia says that the mercury in fluorescent bulbs primarily emits light with wavelengths of 253.7 and 185 nanometers (nm) (which then hits phosphors to create visible light). This graph on this page shows such wavelengths getting completely absorbed by each type of glass tested. Additionally, this epidemiological study has typical fluorescent UV being much less dangerous than sunlight. Even with my box delivering 4.4 times normal fluorescent light (my estimate), a half-hour session would be equivalent to 17 seconds of sun exposure, even without the glass front absorbing the UV. So I expect it's safe.
Disclaimers: Please don't try this if you lack a basic understanding of electrical wiring. If you try it anyway, I will not be responsible for your Darwin Award. Also, this took more work and money than I anticipated. If you can make do with a commercial light box, just buy one.
Although I figured it all out as I went, this is what my shopping lists would have looked like (along with what I paid, before tax):
From the home improvement big box store:
Four 6-inch, 42-Watt fluorescent bulbs with GX24q-4 bases; 3200 lumens each ($40)
6-foot air conditioner power cord ($13)
A bag of assorted wire connector caps (I had some already.)
From the crafts store:
Two shadow box frames, 10"x10"x2" inside. ($42 (on sale for 40% off))
Hardware store:
Several feet of solid 18-gauge insulated copper wire ($5)
Small hook & eye set ($2) (had one left over)
Small hinges ($4.50)
Box of wood screws (size 4 x 1/2) ($4)
Box of short machine screws and bolts (I had some lying around.)
Heavy duty toggle switch ($5)
From the glass shop:
10"x10" sheet of 1/8" thick frosted glass (Should have been $11, but paid $7 due to wrong quoted price. Other places quoted $25 or more.)
From the electrical supply store:
Four GX24q-4 (4-pin) sockets ($28.70)
Two 42-watt ballasts ($54.40)
Things to have on hand:
Aluminum foil
Screwdrivers
Drill
Chisel or other gouging tool
Framing nail gun (or some glue)
Hard, round piece of plastic with a hole big enough for the power cord
2-part epoxy
Here's what much of the core stuff looked like:
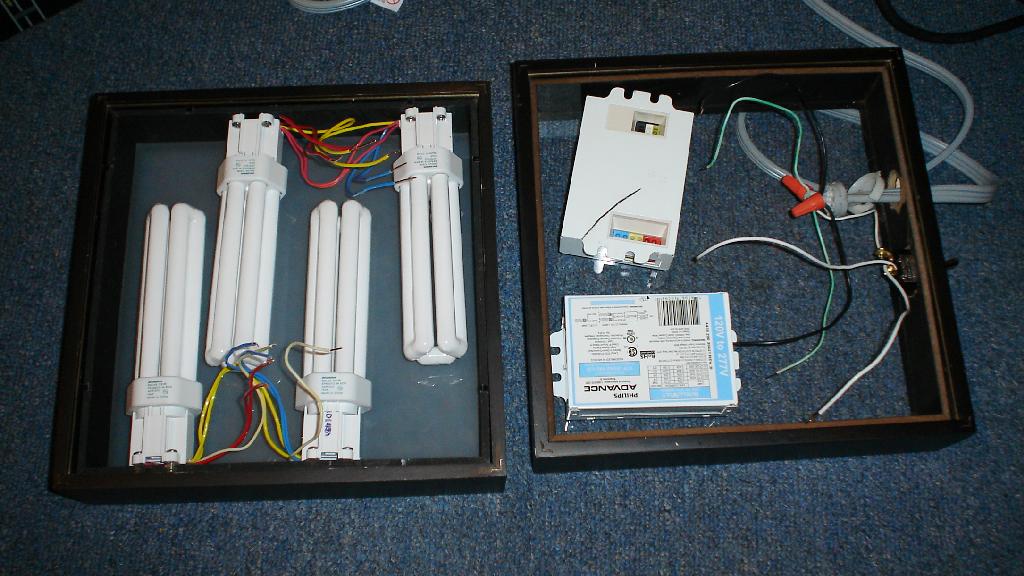
Learn from my first mistake: This light box is tremendously overpowered. If I were doing it again, I'd use half the bulbs, ballasts, and sockets, saving $61.55 right there. I think it still would have been brighter than a commercial light box.
Learn from my second mistake: I also should have looked for some housing roomier than these shadow box frames; screwing the sockets to the frame was very tricky, as I could not fit a normal screwdriver that close to the glass. (I wound up using needlenose pliers to turn an eyeglass screwdriver: An annoyance to be avoided if at all possible.)
Step 1: Install the frosted glass into one of the shadow box frames. I enlisted the help of a friend who happens to be a great framer, as I had no idea what I was doing. (That generally doesn't stop me, but I knew he would be far more efficient, and somewhat less likely to break anything, than I.) He pried the inner frame ("spacer") away from the outer frame that it was glued into, and removed the clear glass. The frosted glass didn't quite fit (I hadn't realized that the shadow box wasn't quite square), so he ground it down a bit, dropped it in, and put the spacer back on top of it. Rather than glue the spacer in, he used framing nails to hold it in from the back, clipping off the protruding ends.
Step 2: (See below before you start this.) Trim back the socket end of the power cord. This was very tricky! I wanted a cord that flared out at the end, so that it couldn't be yanked out of the box, but that had bare wire ends. So I hacked away half of the thick plastic socket (mostly with a chisel), while carefully avoiding the three wires so that they could stick out to a usable degree. This was stupidly difficult, and I severed one of the wires on the first try, forcing me to cut the whole socket farther back.
Learn from my third mistake: I could have bought a (cheaper) dishwasher power cord, which came with the exposed wires at the correct end, and found something to clamp to it, to keep it from getting yanked out. Or I could have plugged something into the socket end of the cord, and trimmed that as needed.
Step 3: Connect wires, plug in bulbs, and test the electronics. (But see "my fifth mistake" below.) I didn't even bother with the toggle switch here. I had never worked with fluorescent tubes and ballasts before, so I just wanted to make sure that I could make light happen. The ballasts come with wiring diagrams. I plugged the extension cord into a power strip that I could switch on and off. I already needed more wire than was supplied with the ballasts. (For some of the wire that didn't come in the right colors, I used magic markers on white wires. Using the right color wires is like documenting your code: It doesn't matter at first, but when somebody (including you) has to troubleshoot it later, it can make all the difference.)
Tip: Even at hardware stores, solid 18-gauge wire may be tricky to find. I called ahead, and found that I could get an entire spool of it very cheaply. That turned out to be bare wire. Oops! I wound up finding it packaged as two wires in a plastic sheath (lamp wire, labeled "18/2") and five wires in a plastic sheath ("18/5"), which would have saved me a couple of bucks if I'd found it first:

Step 4: Screw it! Detach the wires from the ballasts (you'll have to use the supplied flange (small pokey thing) to release them), but leave them attached to the sockets. Screw the sockets into the shadow box frame (the one with the frosted glass). Use firm pressure on the screwdriver, because the spacer is not as solid as it looks, and the screws can shred it if they pull too hard. (Ignore this if you were smart enough to find an alternative to a shadow box frame.) Figure out where you want to mount the ballasts. I mounted them on the inside of the back cover (particle board) of the second shadow box frame, drilling holes for the machine screws. (For convenience and fire safety, I removed the velour covering first.) I also drilled a 1/2" hole for the wires, very near the hinge side of the box so that the wires wouldn't pull out when the box opened. (I could also have drilled holes directly to the ballasts' bottom jacks, but I was concerned that this would make maintenance difficult once the box was assembled.) In one side of the rear shadow box (at the right of the "parts" picture above), I drilled holes for the power cord and the toggle switch. I also had to chisel out a rectangular portion of the spacer to accommodate the toggle switch, which wouldn't otherwise reach all the way through the box. I cut a notch in the side of the small, hard plastic doohick (it was a piece from an old faucet) and mounted it on the power cord (after threading the cord into the box) to prevent the cord from pulling back out.
Learn from my fourth mistake: During its first use of more than a few seconds, my light box got hot too fast, and the front glass cracked. (Though it remained usable.) If, for some deranged reason, you make yours as powerful and as cramped as mine, drill some high and low ventilation holes in the front box.
Step 5: Reconnect wires. I included the toggle switch in the circuit this time, on the white (live) wire. (People sometimes put switches on the neutral wire. As a result of this, I've seen someone get shocked by a light socket that was turned off. Please don't ever do it.) I had to lengthen the wires (i.e., attach extra wires) from the sockets on the side of the box away from the hinges, so that they could reach their ballast through the hole in the back cover of the other box. Make absolutely sure that there is no bare wire showing in the front box with the bulbs.
Learn from my fifth mistake: Use longer wires between the far sockets and their ballast. (I didn't just rewire them because that would have involved undoing and redoing all of my work screwing them in. Remember the needlenose pliers and eyeglass screwdriver?)
Step 6: Assemble! Secure the back cover of the rear shadow box. Install the hinges on one side, and the hook and eye on the other. Crumple a sheet of aluminum foil, and tuck it around the bulbs. (This is why bare wire cannot show here.) Pull it back enough to allow air flow through the ventilation holes. Use your favorite adhesive (I like two-part epoxy) to secure the power cord's socket to the round plastic doohick, and the round plastic doohick to the inside of the box. Hold the cord taut with some weight if needed, to keep all three bits firmly together while the adhesive cures (for however many hours the package indicates).
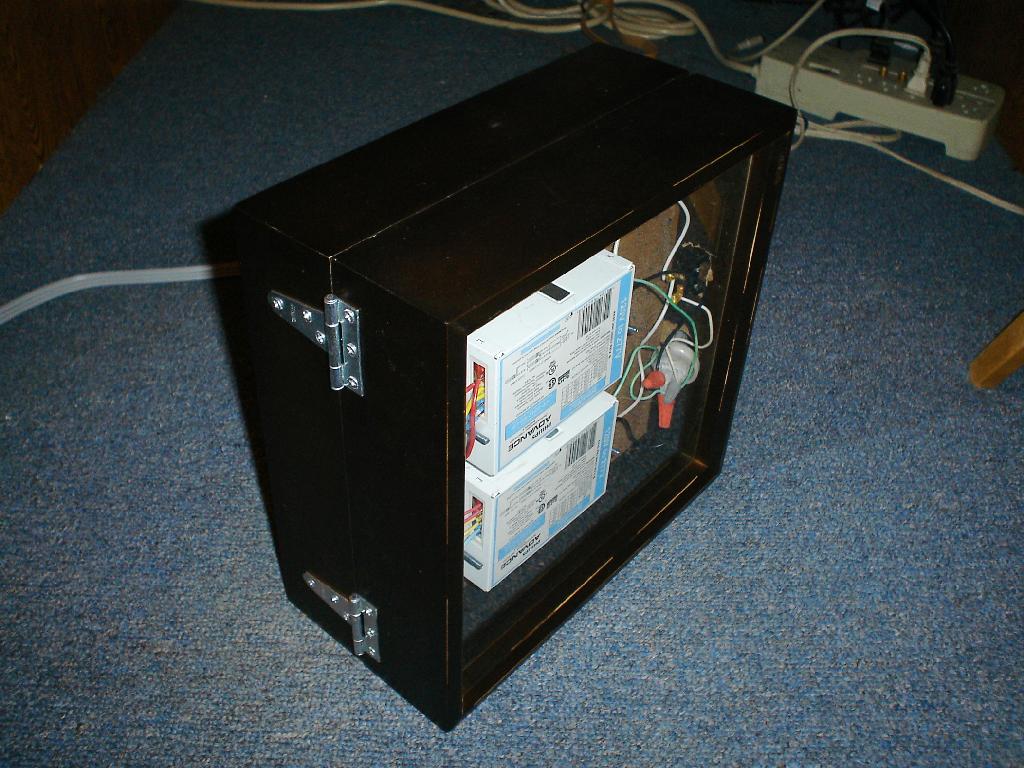

And you're done!
Please comment if you have improvements (aside from the obvious*), especially regarding alternatives to the shadow box frames.
* Just buying a light box.
Edit: My friend Tracey asked what I did about UV protection. The answer is that it never occurred to me. However, Wikipedia says that the mercury in fluorescent bulbs primarily emits light with wavelengths of 253.7 and 185 nanometers (nm) (which then hits phosphors to create visible light). This graph on this page shows such wavelengths getting completely absorbed by each type of glass tested. Additionally, this epidemiological study has typical fluorescent UV being much less dangerous than sunlight. Even with my box delivering 4.4 times normal fluorescent light (my estimate), a half-hour session would be equivalent to 17 seconds of sun exposure, even without the glass front absorbing the UV. So I expect it's safe.